|
Scale
Lumber, Building Kits and related Products for Garden Railroading. Our
Kits can make the Novice Modeler look like a Pro!
|
| Visit Our Store |
| Wild Rose Saloon Kit
|
(click on photo's for a larger image)
| |
Scale
Lumber, Building Kits and related Products for Garden Railroading. Our
Kits can make the Novice Modeler look like a Pro!
|
| Visit Our Store |
| Wild Rose Saloon Kit
|
(click on photo's for a larger image)
Glue Tips,
Make sure to use a waterproof glue suitable to your climate. If you can get waxed paper in your area, for frame elements, we dip the ends in glue and put them in place on the wax paper over the drawing. The new waxed paper we get has little wax, and works great as the glue sticks slightly to it making it stay in place. It peals off well after the glue is set, but leaves glue that might have to be trimmed later for fit with other components. As with all glues, excess is best cleaned up before it sets. If you will be doing a clear finish, we have found that small glue mistakes don't show if clear setting glue is used, and Thompson's clear water seal is used. Still it is best to clean up, especially areas where a hardened glob interferes with further construction. (Easier to remove a soft lump than a hard glob)
Cutting Tips,
For cutting small material (1x2 & 1x4) a sharp knife or even side cutter can be used. For larger sizes a razor saw or band saw with a fine tooth blade works well. For fine tuning a piece of sandpaper laid on a flat surface works great, holding the piece vertical and giving it a few strokes with light pressure across the sandpaper. With all tools, caution and safety is important. Remember this is a real wood product. There might be some warping. Material if not being used for a while (overnight) should be wrapped or bundled together. So when you stop for the day, wrap it up. If you do get some warped pieces, carefully bend them in the opposite direction and you can temporarily remove some of it. Once it is glued together as a composite structure it will become stable. Most material is shipped in 18"-20" lengths, that is equal to 36-40 feet in real dimension. I don't think you will find many real boards that long without some warp. Always cut longest elements first and use the leftovers for the smaller items.
Layout Boards,
Also notice the layout board we have been using. It serves as a nice flat work surface. It is made of a piece of graph paper sandwiched between two pieces of single strength glass. The edges are taped together with clear packing tape. The graph paper makes it easy to keep things square. We recommend you use wax paper to keep glue from sticking laid on the plans and on your layout board if you use one, but it isn't always available here and might not be in your area. So on with the show!
One last tip before starting.
A blob of glue on a scrap of wood, works good for gluing framing elements. If you lay wax paper over the plan, the extra glue sticks to the waxpaper holding the parts in place better. Just dip the ends of the parts in glue and place them on the covered plan. After the glue is set, peel them off the waxpaper, and clean excess dried glue off with a sharp hobby knife
.
Start by laying out a base frame with 1/4" framing material. Outside dimensions should be 12" wide x 10" deep. Making sure to keep it square and flat.
Add 1/4" x 1/2" (6x12) cross piece per layout drawing #4. It ends up underneath where the front wall and the back edge of the porch decking attaches.
Marking stock to length by laying it on the drawing. Cut long elements first using the leftovers for the shorter items. Keeping your pencil sharp makes for more accurate cuts.
Frame front wall per layout drawing #1. Make sure to keep it square and flat. Leave off the 2 x 4, porch roof support (attachment point for back of porch rafters) until the siding is applied.
.
Leave the bottom plate one piece (full width) until done, then cut for the door opening before attaching the front wall to the base frame.
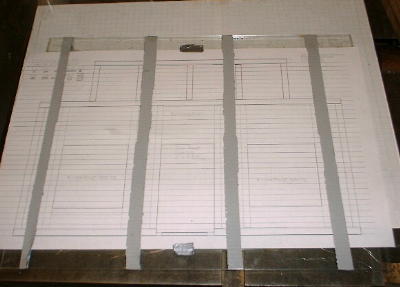
Layout 1x6 siding for front wall using the siding spacing sheet (drawing #3). Use tape face up (duct tape works well) sticky side up laid on top of the drawing. Don't stretch the tape or it will shorten the wall when you turn it over for gluing. Four strips shown here between door and windows and windows and ends of wall.
Backside of layout board with tape twisted so sticky side could be stuck to the glass.
Cut 10 pieces at 12" for top of the wall and set those aside as they will be applied last. Using the short leftovers first start at the bottom placing best side up on the front spacing drawing. Press them firmly onto the tape working you way across adjusting as you go to stay on the lines. First piece with it's bottom lined up with the bottom of the frame work of the front wall.
Place the next board lining up its top with the next line on the spacer sheet.
Cut them to length, and work your way up to the top around the window and door openings.
The tape will hold them together well enough so you can turn it over, and apply beads of glue top to bottom, and spread them out with your finger. Leave no lumps that might interfere with gluing the siding sheet to the framing. This will hold them together so you can remove the tape and glue the siding sheet to the front frame. Attach 2x4 crossbeam to siding for porch roof support 1/8" in from the ends of the wall.
Finished siding sheet.
Here carefully lifting by the tape strips so it could be turned over. Secret is to be careful so you don't stretch the tape.
Once turned over spread the glue. A finger works well, but a stiff brush like a soldering flux brush works well. Spread from the top down as that forces the glue into the joints.
Peeling the tape off. Secret here is keep low angle pull at a right angle if you pull upward it will put too much force and possibly pull the siding sheet apart. There is another way. Just like for the door sections below, lay wax paper over the drawing and put beads of glue down on top of it. Then place siding face up onto the glue beads. Lining up the pieces just like with the face down tape method. Both methods require care but the sheet method is still easier.
Glue placed on front wall framing and placed on the face down front siding sheet. Held down with wood blocks.
Attach 2x4 crossbeam to siding for porch roof support 1/8" in from the ends of the wall and 4 1/2" to the top of it. Also notice we cut the 6x6 across the bottom of the door opening..
Attach front wall to base frame with its front ¼" back from the front edge of the 6x12 base element. Kept square by clamping a diagonal piece of lumber with spring clothes pins.
Then frame side and back walls with 1/4" framing materials per the layout drawings.
Side walls, notice clamping. Common sense and a few scraps, wood blocks and gravity. Point is this is not rocket science just basic building.
Not shown on drawings is the back wall. For this use a center and top cross beam, and some vertical blocking in the center. Roof drawing shows support for roof. Make sure to keep things square. Appearance of framing isn't important, as the siding and roofing hides it when the building is done.
Center upright clamped in place. Notice there were 2 center 6x6 roof beams as shown here. In later versions of this kit 3 were used. Follow the plans that came with your kit. These tips pages were done based on the prototype of the kit may not show all updates. There was a problem with roof board warping that wasn't reported with cedar lumber but we offered pressure treated scale lumber as well when this kit was introduced and it was more of a problem with the treated lumber.
More of backside framing and clamp methods we used.
Using 2x6 for front deck area cut pieces to length (we used 49). Starting at the ends and work your way to the middle and trim the last one to fit to maintain 1/8 " overhang at the front and both sides.
Make a threshold for the door opening out of 2x6 to raise the door opening up to porch floor level.
Using 1x6 for jambs in the window and door openings. Make sure it is flush with the highest points of the lap siding.
Apply 1x4 as trim around openings. Top trim piece can be left long, as was done on old west buildings.
Use 2x2 for dividers using drawing #1 as a pattern to help keep them square. Adjust lengths as the drawing doesn't allow for the jambs. Install them so they are flush with the jambs on the back side to make it easier to add glazing.
Standard doors per drawing #1 are framed with 2x2. Not a great picture as the wood block holding it down while the glue sets is blocking view of them. We did the door as one piece and glued it in the closed position to hide the siding applied from the backside as filler. Our 2x2 frames were 1 ½ " tall and 15/16" wide to fit our opening. We created the filler and attached the frames to the front of it. The drawing doesn't have the jambs shown to simplify things and construction differences can cause some slight differences so adjust size to fit your opening. Use 1x6 lapped like the front wall siding, use the spacing lines same as the front siding and apply it to the back side of the door frames to simulate a louvered appearance.
Start of the lapped filler for the backside of the doors. Beads of glue on wax paper and 1x6 pressed into the glue.
2x2 frames laying on filler.
Standard doors in place.
Or, the optional bat wing style shown on drawing #4, with the top curved parts carved from leftover 2x12. Your choice. Shown here over the plan with the first 2x2 uprights in place at the center. For our finished results we did this style (bat wing door) as separate halves glued to the opening slightly open.
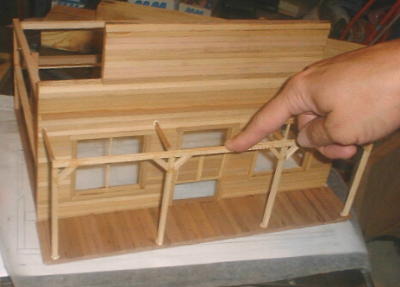
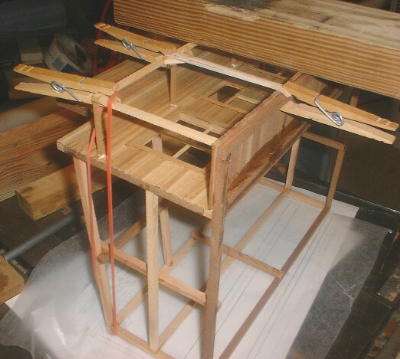
With 4x4 make the front porch frame. Space the 4 3 3/4" long posts per the layout drawing. Attach 4x4 corner gussets to top of posts. Gussets not shown in this photo.
Attach the lower 2x4 and 2x4 rafters per the layout drawing. We used blocks of wood to hold the porch framework square with the attached lower 2x4's of the porch truss assembly.
Real original clamping method here. My finger found an angle that held all the glued points tight and I held it for about 15 minutes until glue set enough to hold.
Then weights and pins to tie it together.
Rubber bands to pull things tight in this photo. Clothes pin holding the rubber band to the work piece.
Leave 1x12 roof boards overhang on front & sides 1/4". We used 21 @ 2 1/4" long.
Space them approx. 1/8" apart. Adjust so they are evenly spaced with gaps narrow enough to be covered by the 1x 4 battens.
Apply the 1x4 to cover the gaps. We left them a little long to make it easier to handle. Extra material is in the kit for this for about 1/4" on each one.
Clamping and good old gravity used here to hold the roof battens flat.
Fill in the end frames with 1x6 siding.
Don't be to perfect with trimming the bottoms as it adds to the realism.
Make sure to set aside 18 pieces of 1x12 13" long for the roof before the next steps. Apply 1x12's flat not lapped to backside of front wall top. Clamp in place or weight down until glue sets.
Add 2x12 as cap on center and both sides of the façade top. All three (center and 2 sides) should overhang on the ends that are open ¼" beyond the framing and flush with the siding on the backside of the façade.
Apply 1x12 side wall siding vertical starting at the front corners several pieces at a time butting them tight together and weighting them down with wood blocks until glue sets. The first piece at the front corner should go all the way to the top of side façade cap. Trim it narrow at the top so the backside is flush with the siding on the backside of the front wall and its front side should be flush with the highest points of the 1x6 lap siding. Use 1x12 (to cover the side framing and siding ends) on the sides of the narrow part of the front façade, keeping the front flush with the high points of the siding and trim the back flush with the backside as before.
1x12 applied to side wall shown here and clamping method. Other side wall should be done the same.
Back wall notice trimming around framing element.
1x12 continued across back.
Install 1 x 4 corner boards on all 4 corners. I like to do side boards first making sure front side is flush with front wall siding high points.
Then Front corner board applied to cover side applied corner board front edge.
Corner board treatment for front facade.
Layout 1x12 (we used 18 @ 12 3/4" for 1/4" overhang beyond the batten strips) for lap roof using 11"exposure spacing sheet as done for the 1x6 on the front wall. Actually we left them 13" long and after sheet was done we marked it to fit our building in case things were a little off or out of square.
Same as front siding sheet, place first 1x12 lined up bottom to bottom of first line. Then place next one with it's top lined up with next line. This will give you 11" exposure.
Wood blocks and gravity to hold things in place until the glue sets. Allow for 1/4" overhang on sides and back. Attach roof sheet.
Finished with standard door, front view.
Rear view.
Front view with optional bat wing door on our layout.
Another shot....
With signs added sitting among the wild roses it was named after.
Foundation of exposed rock was made with mortar mix and pea gravel. Steps will eventually have railings. A smoke unit is installed that is made of flashing material. Smoke comes from mosquito coils that smolder like incense.
Finish with exterior paints, as you would a real outdoor building. We recommend buildings be sealed inside and out after painting with a water proof clear sealer and be taken in over the winter months.
Good Luck and Happy Railroading!
Let us know if you have any suggestions or inputs for this tips page!
Thanks,
Mark & Sue Smith
Smith Pond Junctions Railroad Products
Team@spjrr.com
Little Lumber is Our Business
All Rights Reserved