Trestle Bent Kits and General
Trestle construction
At
the end of the General trestle information an added section showing
us building trestles onsite for our layout including a curved one
Glue Tips, Use waterproof glue suitable to
your climate and available in your area. As with all glues excess is best cleaned
up before it sets. If you will be doing a clear finish, we have found that small
glue mistakes don't show if clear setting glue is used. Still it is best to clean
up, especially areas where a hardened glob interferes with further construction.
(Easier to remove a soft lump than a hard glob) Cutting
Tips, A razor saw or band saw with a fine tooth blade works well.
For fine tuning a piece of sandpaper laid on a flat surface works great, holding
the piece vertical and giving it a few strokes with light pressure across the
sandpaper will shorten a board up just fine. With all tools, caution and safety
is important. Remember this is a real wood product. There might be some warping.
Material if not being used for a while (overnight) should be wrapped or bundled
together. So when you stop for the day, wrap it up. If you do get some warped
pieces, carefully bend them in the opposite direction and you can temporarily
remove some of it. Once it is glued together as a composite structure it will
become stable. Most material is shipped in 18"-20" lengths, that is
equal to 36-40 feet in real dimension. I don't think you will find many real boards
that long without some warp. Always cut longest elements first and use the leftovers
for the smaller items. Work area, Use a
flat smooth surface to work on. We recommend you use wax paper laid on the plans
and on your layout board to keep glue from sticking. So on with the show!
(click
on photo's for a larger image)
The kit builds two trestle bents in whatever
size you purchased. The 6" bent dimensions are 5" wide at the top, and
the base is 6 ½" wide. Overall height is 6 ½" with the
optional bottom crossbeam meant to be buried in the ground to add stability to
your trestle. The 12" bent dimensions are 5" wide at the top, and the
base is 8" wide. Overall height is 12 ½" with the optional bottom
crossbeam. The 18" bent dimensions are 5" wide at the top, and the base
is 9 1/2" wide. Overall height is 18 ½" with the optional bottom
crossbeam. The 24" bent dimensions are 5" wide at the top, and the base
is 11" wide. Overall height is 24 ½" with the optional bottom
crossbeam.
The instructions below are showing how all our trestle bents are
built as well as overall trestle constructions and suggestions.
Use a sharp pencil to mark material for cutting. Most elements can be cut with
no measuring at all by marking them from the drawing. Make sure to cut the longest
parts first and use the leftovers for the shorter ones. These instructions are
for all 4 of our trestle bent kits.
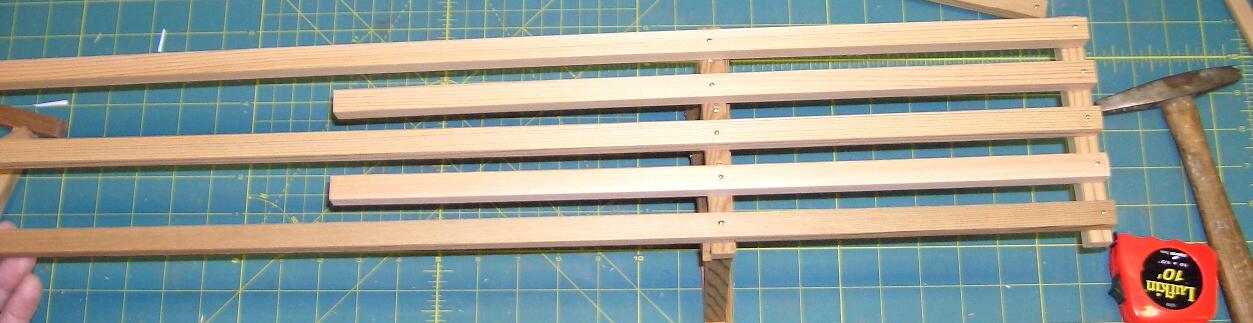
Start by laying out the frame with 12" x 12" . Make sure to keep things
as square as possible. Work on a flat surface. Waxpaper laid on top of the drawing
will keep glue from sticking to the plan sheet. We used the optional 12"
x 12" bottom crossbeam this further stabilizes the bent. Add elements a few
at a time, weighing them down with wood blocks as shown here or whatever you have
to hold things in place.
The 4" x 12" sway brace applied on the topside. After the glue has set
up, turn it over and apply the sway brace to the other side.
One bent complete. We found it easier to wait until the glue was cured before
nailing. In this case we used 18 gauge brass escutcheon pins. The difference between
them and brads is a larger rounded head. Our local hardware store didn't have
the recommended 7/8" so we used 1" for the 12" x 12" to 12"
x12" joints, and ½" on the sway braces. Your choice as to what
you use. Brads, escutcheon pins as well as material, brass, or plain wire. Wire
brads are available in plated versions so they don't rust. But you may want that
look. You may want to drill the 4" x 12" sway brace material as you
might get some splitting. We used a #55 drill bit. You will also find it easier
than trying to hold the brad with a pliers or nail starter. We used an old fashioned
tack hammer. FYI, the 1" pins from the hardware store weren't 1" long,
actually 15/16" so they worked out just fine.
Here starting on a 12" bent kit using the same method of construction.
Again wood blocks used to hold down the sway braces while the glue cures.
An example of using a needle nose pliers to hold a short brad. Lightly tap it
with a small hammer.
Another option shown here is a brad setter pliers used for picture framing. They
are available from Rockler woodworking stores usually for less than $10.00. You
might also decide to use an air nailer to speed up the process especially if you
are constructing many bents.
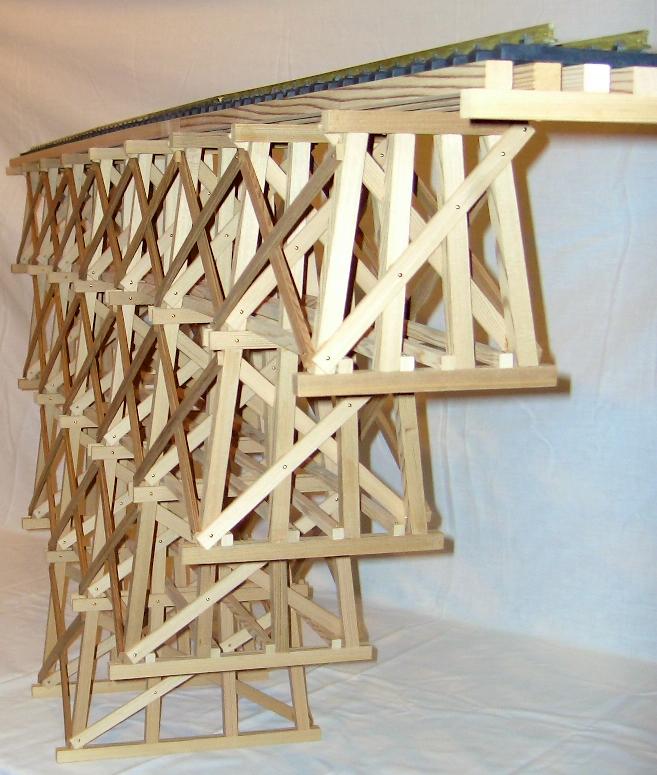
Right a pair of bents in all 4 sizes (6", 12", 18" & 24")
completed and ready to assemble into a trestle. There are many ways to build a
trestle. What we recommend is what we have seen on actual layouts that look the
best. It is your choice as to how far apart you place your bents, what and how
much bracing you use and if you want girts. In our opinion, the more bracing makes
for a busier looking and more detailed end result. For the example we are spacing
the bents 8" on center. We are using 4" x10" for sway bracing on
all levels as well as 8" x 8" girts. This is why we decided to sell
bent kits and offer the stringer and bracing material separately so you could
tailor the trestle to meet your needs. Also sell the track stringer material separately
as you might want more or less depending on your application.
Above
3 24" pieces of 12" x 12" track stringer material nailed on one
end to a piece of leftover 12" x 12" from building the bents. Spaced
as shown on page one of the plans. The inner 2 will be shown later in shorter
length to stagger the joint to make the trestle stronger.
Top view of 6" bent with its center 8" from the end. The inner stringers
in place with their length meant to meet the center of the next bent.
Completed stringers with bents attached on 8" centers. Placed upside down
on a flat table. This uses one of each of your bent kits and ends up being 6'
long and 25" tall.
Trestle on its side and starting to add 4" x 10" cross bracing. Use
a square as you go to keep the bents perpendicular to the track stringers. Keep
in mind you might have to trim sway brace ends it they interfere with your cross
brace application.
Upright and all cross bracing done on one side. Joints of a single 4" x 10"
to the 12" x 12" we used a ½" escutcheon pin, and on the
double layer we used ¾" pins.
Bracing
started on second side.
An example of having to trim a sway brace so the cross brace would fit flat against
the 12" x 12" bent leg.
End view showing 8" x 8" girts added on the upper layer. Start with
the center ones as we found clamps interfered with application of the outer ones
on the top level.
Center girts clamped. Continue with the girt on each level.
The completed trestle with a section of Aristocraft track on top.
A couple of angle shots
this one showing a better view of the girt application. For this trestle besides
one of each bent kit, we added (15) 24" long 12" x 12" track stringers,
(20) 24" long 8" x 8" for girts, and (32) 24" long 4"
x 10" for cross braces. Escutcheon pins were purchased in 2 ounce packages
from the local hardware store in ½", ¾" and 1" lengths.
There was some of each size left.
One last addition was a fire barrel platform (Not shown on the plans) that was
made from leftover scraps. It sits on a pair of 8" x 8" beams that slide
under the track between the ties.
Top view, the railing sets back about ½" from the end of the ties
which for all of the locos we own leaves more than enough clearance. The platform
is approx. 3 ½" square. You will probably have enough scrap material
to make a couple of these.
We recommend all parts that come in direct contact with the ground get a
good sealing with any clear sealer that works in your area. If you stain the
wood, do that first then seal. If you want to have a natural gray cedar finish,
seal only the ground contact areas (footings) and let Mother Nature do the
rest.
Below a new section added
Construction area below, watch out
for errors.
As many of you know our layout was damaged in storms several
years ago. There was a small section undamaged that we continued to test products
suck as adhesives and paints that could be used with our products. We used
this rebuild as a chance to show some different construction things during
the process of rebuilding involving trestles. We built mountains with mortar
mix over wire mesh lathe that is used under stucco on houses and decided we
would create a base for the trestles to set on using this same material to
keep weeds from growing up through the trestle. This does add a challenge
as you have a solid base to deal with and not as easy as doing a trestle over
soft ground that can be adjusted to fit the height of the trestle bents.
This photo shows a 4x4 spanning the gap between 2 mountains. Marks showing
where the center of the bents go. We worked close to the 8" on center
standard we use for our trestle package kits.
Holding a torpedo level level under the timber and measuring to the solid
base below at as close to the width of the bottom of the bent.
Bent marked for cutting.
A couple of bents in place and track stringers added. Notice the staggering
of joints of the stringers. This keeps things straight and stronger.
More parts added.
Mostly complete, notice pieces of 12x12 used as spacers between the track
stringers to aid in spacing during gluing and nailing.
Finished, sealed and in place. Later pea gravel will be added underneath that
will cover any small measurement mistakes on bent height. This part was done
end of summer 2010.
The last trestle a small curved one
Beginning of summer 2011 we added color to mortar the mountains. One last
trestle as the transition from the mountain to ground level. We had the track
down. If it is one thing we learned, doing a layout first time is much easier
than redoing one. The removal of downed and damaged trees, pulling up old
track and building base areas took what seemed forever.
This is a 4"radius section on the layout. Track in place and blocked
up in place. Shims and wood scraps used to get it level for the measuring
of how tall the bents should be.
Marks on the base showing where the bents will be.
Same as the straight method of measuring above except the level is being held
against the bottom of the track ties.
Dimensions transferred to each outside leg of the bent.
A scrap of 12x12 placed above the marks (to allow for the track stringers
added later) and all legs marked along the top of the 12x12.
Here on the saw table cut and 4x12 sway brace glued in place. After the glue
set up, then we did the brass brads.
Braces on both sides and ready for the layout.
First with a scrap of 12x12 on top to check fit.
First two bents were to be on the beginning straight section of this curved
trestle. Center track stringer nailed and glued in place and making sure they
are square.
End of the straight section. Center stringer on 8" centers. The outer
ones will be longer and inner ones shorter. This is something to consider
as you cut parts. Always use the short leftovers for the shortest part they
will make. Just makes good sense and saves money in the long run.
Completed straight section in front of the track. Pulled out for addition
of side bracing.
End view of straight section. Notice most of the track stringers trimmed at
an angle. (Made a mistake on the center one), not a problem, just compensated
with the next ones. Once it is covered by the track, most small errors won't
show.
Straight section in place with some side bracing done.
Getting into the curve, a piece of 12x12 placed at the bottom where the next
bent will go and a line marked parallel with the ties in that area. The angle
of the photo doesn't show it parallel, but it is.
Next bent in place. Used the same measurement method as earlier. At the bents
we tried to keep the tie in the area of the bent centered.
Continued on to this point and marked where the end of the trestle would be
on the track stringer. In this case since we had soft ground ahead we placed
it 8" out from that last really short bent. Yes that last short thing
is a real short bent. At this point we lifted the track off and took the trestle
to our shop where we could lay it on a flat surface and add the last 4x10
side bracing.
Here in place. Pea gravel underneath. Ground at the end adjusted as needed.
Good Luck
and Happy Railroading!
Thanks,
Mark & Sue Smith Smith
Pond Junctions Railroad Products Team@spjrr.com