|
Scale
Lumber, Building Kits and related Products for Garden Railroading. Our
Kits can make the Novice Modeler look like a Pro!
|
| Visit Our Store |
|
Cedar Creek Barn Kit
|
(click on photo's for a larger image)
| |
Scale
Lumber, Building Kits and related Products for Garden Railroading. Our
Kits can make the Novice Modeler look like a Pro!
|
| Visit Our Store |
|
Cedar Creek Barn Kit
|
(click on photo's for a larger image)
Glue Tips,
Use waterproof glue suitable to your climate and available in your area. As with all glues excess is best cleaned up before it sets. If you will be doing a clear finish, we have found that small glue mistakes don't show if clear setting glue is used. Still it is best to clean up, especially areas where a hardened glob interferes with further construction. (Easier to remove a soft lump than a hard glob)
Cutting Tips,
A razor saw or band saw with a fine tooth blade works well. For fine tuning a piece of sandpaper laid on a flat surface works great, holding the piece vertical and giving it a few strokes with light pressure across the sandpaper will shorten a board up just fine. With all tools, caution and safety is important. Remember this is a real wood product. There might be some warping. Material if not being used for a while (overnight) should be wrapped or bundled together. So when you stop for the day, wrap it up. If you do get some warped pieces, carefully bend them in the opposite direction and you can temporarily remove some of it. Once it is glued together as a composite structure it will become stable. Most material is shipped in 18"-20" lengths, that is equal to 36-40 feet in real dimension. I don't think you will find many real boards that long without some warp. Always cut longest elements first and use the leftovers for the smaller items.
Work area,
Use a flat smooth surface to work on. We recommend you use wax paper laid on the plans and on your layout board to keep glue from sticking. So on with the show!Before getting started, now is a good time to look over the plan set and decide if you are making any other changes you might think of to personalize your barn to fit your design thoughts. As with the Cedar Creek Homestead, this barn started out as the large main part, then as more space was needed the side portion was added. Interesting in comparison to how houses grew in the midwest prairie states. House started out small and later a large addition was added for the growing family. The barn usually started out larger then smaller additions on either side were added as needed.
Use a sharp pencil. You can mark most elements right off the drawings with very little measuring.
Start by laying front and back wall per drawing #1 with 2x4 on edge. Start with a few elements and add more until the walls are finished. Always cut long pieces first then use the short leftovers for blocking.
Front wall done. Blocks holding things down until the glue cures. Next build outside side wall for the large part of the barn and the other outside wall of the side addition with 2x4 on edge per drawing #2. Window dividers and trim will be done later. This is a good time to consider changes to window location or the number of windows on the large outside wall.
Inner support beam structure with 6x6 per drawing #2. This acts as support for the inside ends of the main structure roof trusses.
Lay the large out side wall and the inner support beam structure on drawing and mark where the trusses are attached.
Assemble all walls together. Both the large and small outer walls go inside the front and back walls. Photo to the right shows large outer wall attached to the front wall.
This foot print should end up 19” x 17”. The inner support beam location is shown in green on the front wall of drawing #1. This drawing shows details of many other things as well.
Inner support beam shown here, note position. The edge toward the small section of the barn is lined up with the end of the top 2x4 of the large section front wall.
Trusses are made with 2x4 laid flat. If you want hay loft doors at both front and back, you will need 2 of that type and 8 of the other ones per drawing #2. Your choice, we did both front and back.
Here a completed end truss. We made the end ones to exact size. The rest we left the rafter ends 1/16” to 1/8” longer than the plan. They will be trimmed later. There are extra drawings of the center trusses on drawing #3 to speed up your building progress.
Lay structure front wall down on a flat surface and attach the end truss. After the glue has set up, do the same for the back wall truss.
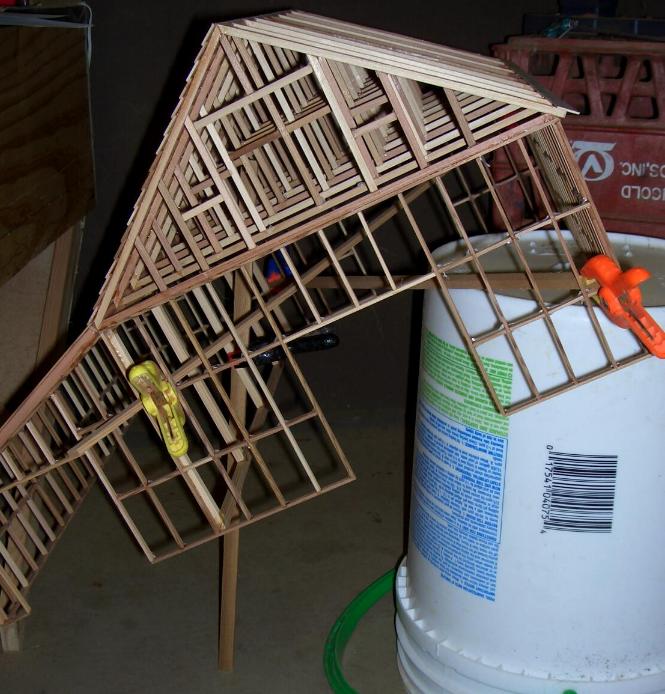
Add the center trusses. Notice here we used a piece of 1x12 clamped to the end trusses at the peak as an alignment tool. Also a couple of sticks clamped to the wall and truss to keep them straight.
Center truss added. Note clamps on peak alignment board are on either side of the truss just to hold it upright. There is also a piece of lumber clamped to the top of the walls with the blue clamps. This is to hold the walls in place as one side had bowed a bit.
The rest of the trusses in place.
Use a straight edge to mark where to trim the ends of the rest of the trusses.
Add pieces of 2x4 between the trusses at the peak for strength. Easy to measure for them is to make them fit between the trusses where they attach to the outside wall and attach them to the peak.
Photo of 2x4's in place between the trusses at the peak.
Use 2x6 on edge to build the side section roof support structure per drawing #3. Adjust size as needed to fit your construction results.
Add the side roof support to the top of the walls. Its inside edge should be tight against the inside ends of the main roof trusses and the outside edges of the other three sides should be flush with the outside edges of the wall framing. Note that means the top edge of that outer 2x6 end is what should be flush with the outside wall framing of that short side wall.
1x12 for roof boards applied parallel to the front and back wall. The inside end should end at the ends of the trusses of the main structure. The other end should overhang the wall framing by 1/4” and the same on the end pieces should overhang the front and back wall 1/4”.
A closeup of the overhang on the end 1x12 roof board.
A piece of 1x12 clamped with its bottom edge butted against the top edge of the end roof boards.
Work your way from each end butting the boards tight together.
When you get closer to the center, check fit. On the prototype we were able to leave a slight gap between the boards and fill the gap with no trimming of boards necessary. Just remember the gap has to be narrow enough to be covered by the 1x2 batten boards that will be installed later. We ended up using 35 roof boards on this section 7 7/8” long.
Just the last few center boards we left about 1/32” gap. If you have to trim boards to fit, an easy way to do it is to hold the board on edge on a piece of sand paper on a flat surface and slide it back and forth. If you have a lot to trim spread it over several boards removing a little from each so you don't have one very narrow board in the center.
Start with 1x12 on the main structure. The bottom of the first one should overhang the ends of the truss rafters by 1/4” as shown on drawing #1. and 1/4” overhang on the front and back walls. The one on the other side
should overlap the roof boards on the side structure 1/32”.
Cut several spacer strips from drawing #3. Cut off the first board part way (the baseline point) shown on the spacer strip drawing. This end edge will butt against the top of the first board you have already attached.
We used 6 strips.
Glue the strips directly to the end two trusses as well as at least one on one of the center most trusses.
Structure at an angle so the main roof is more level. This allows us to use blocks to hold the boards down until the glue sets up. The Inner support wall is sitting on a bucket and a stick clamped as a leg to the framing. It can be seen bottom left corner of the photo.
Start attaching the remaining roof boards. Line up the top of the next board with the next line on the spacing strip and work your way to the peak. Trim the last board at the top as needed. Make sure to keep the overhang at 1/4” on the front and back wall framing. An easy to do this is to use a leftover scrap of 6x6 as a spacer as shown.
Last few boards held down by blocks and clamps at the peak. We were able to adjust the overlap on the last 3 boards so we didn't have to trim the top 1x12. The overlap was increased just slightly and once the building is done and painted will be almost unnoticeable. We used 17 pieces 18” long on this side including the first one attached at the eaves.
A closeup showing the altered overlap.
Other side, same method of bucket and stick to get the last section of roof to be done level. We used 18 pieces 18” long on this side.
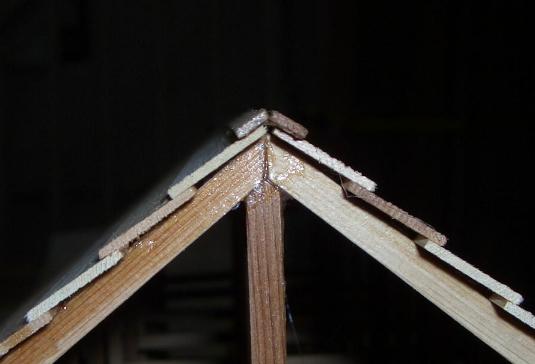
Use 1x4 for roof cap as shown on drawing #1. We placed 2 full length 1x4 side by side on waxpaper and applied a thin film of glue to them. Let this set up for a few minutes until it is still somewhat flexible. Then apply another thin coat of glue.
Then place the boards glue side down on the peak of the roof leaving the excess overhang the ends of the roof. The layers of glue will act as a hinge as you gently fold them into shape at the peak. Then trim the ends after the glue has cured flush with the ends of the roof boards.
1x2 gets applied over the cracks between the side structure 1x12 siding boards.
At the top end they should butt tight against the bottom edge of the bottom 1x12 roof board on the main part of the structure.
We leave them about 1/4” longer than needed so you have extra to hold on to as you apply them.
Then the ends can be trimmed off later with a side cutter or razor saw after the glue is dry.
1x12 siding starting with the side walls applied vertically. Start at a front corner and work your way to the other end trim around window and door openings as needed. Also trim around truss ends on the large side wall. Siding should extend to the bottom of the roof boards. Trim the last board to be flush with the framing of the back wall.
Make sure to use small leftovers above and below the windows and any other place where its possible to make best use of your material.
1x12 vertically for both front and back walls. Start at one corner with it covering the end of the siding of the side walls. Trim around doors as needed, and remember to do a good trim job on the door openings as there are no jambs used on the door openings in this kit. Also try to keep the top of the boards as tight against the bottom of the roof boards as possible. Trim the last board as needed to be flush with side wall siding.
Window jambs installed using 1x6. The front edge should be flush with the outside edge of the siding.
Then 1x4 trim boards applied. A nice detail is to leave the top piece of 1x4 trim overhang the side pieces.
2x2 windows dividers are optional, but a nice detail. Use the drawing as a good way to keep them square however adjust their size as needed to fit your trimmed window opening. Cut the parts to fit your openings as construction results can vary.
Then shown here center them on the drawing and mark for making a notch. You can also cut them as separate parts, however we prefer the notch method.
Mark the cross piece.
Here the pieces with the notches. We use a small band saw to do this, but it can be done with a razor saw by cutting half way through on each end of the notch and carving the center out with a hobby knife.
A drop of glue in one notch then use the drawing as a guide to square them up.
Place their backside flush with the backside of the 1x6 jambs as this makes for easier installation of glazing.
Door openings get 1x6 added as trim just like the windows except for the bottom of the lower doors don't get a piece at the bottom.
Bottom of wall showing 1x6 corner boards installed per detail on drawing #3. Front and back wall corner boards should cover the front edge of the sidewall corner boards.
Doors, several options here. First is the main section doors. Drawing #1 shows on the front wall the door sized to fit inside the door opening and the back wall drawing shows a larger door (maroon in color) that overlaps the door opening as a sliding door option. We chose to do the sliding door option on the prototype.
The lower doors are framed with 2x6 and the hay loft doors are framed with 2x4. Adjust size as need to fit your door openings. All the non sliding doors can be built as one solid piece per drawing #3 if you are planning on attaching them in the closed position. However we did them as separate halves so we had other options available to us later. Main section sliding doors build are one solid piece framed with 2x6 per drawing #3.
The backside of the doors get 1x12 boards attached. We did them vertically to go along with the siding.
All the doors completed
Easy way to adjust doors to fit the openings is to sand them as shown here. If you do sliding doors as we did the top of the door should be at the top of the 1x6 trim on the door opening.
The slide trough shown on drawing #3 is made with 2x4 for the front piece and end pieces with a 2x6 added as a cap.
Both slide troughs done. They will be attached directly to the siding of the wall to hold the top of the door against the wall.
The trough is meant to simulate the cover of the track and door hanger hardware on a real sliding barn door.
The slide trough should be placed over the top 1x6 trim board of the door opening. The extra length toward the center of the building. Make sure it fits the height of your door. Since there is no bottom control of the door, we suggest gluing it in place in what ever position you desire after painting is done. Attach all doors as you desire. On this end you can see we left the hayloft doors open slightly. If your door fit isn't good the open position is best.
One last thing we glued some left over 2x4 at the bottom of the walls across the center of the building to keep the bottom of the side walls straight until we decided where we were going to put this on our layout and what kind of base we will be attaching it to.
View of the back wall. Sliding door slightly open as are the upper hay loft doors.
Painted, we used red for the walls, brown for the roof and off white for the trim.
Finish with exterior paints, as you would a real outdoor building and seal inside and out with a good clear exterior sealer. We recommend buildings be taken in over the winter months.
Good Luck and Happy Railroading!
Thanks,
Mark & Sue Smith
Smith Pond Junctions Railroad Products
Team@spjrr.com
Little Lumber is Our Business
All Rights Reserved