|
Scale
Lumber, Building Kits and related Products for Garden Railroading. Our
Kits can make the Novice Modeler look like a Pro!
|
| Visit Our Store |
|
Cedar Creek Covered Bridge
|
(click on photo's for a larger image)
| |
Scale
Lumber, Building Kits and related Products for Garden Railroading. Our
Kits can make the Novice Modeler look like a Pro!
|
| Visit Our Store |
|
Cedar Creek Covered Bridge
|
(click on photo's for a larger image)
Glue Tips,
Use waterproof glue suitable to your climate and available in your area. As with all glues excess is best cleaned up before it sets. If you will be doing a clear finish, we have found that small glue mistakes don't show if clear setting glue is used. Still it is best to clean up, especially areas where a hardened glob interferes with further construction. (Easier to remove a soft lump than a hard glob)
Cutting Tips,
A razor saw or band saw with a fine tooth blade works well. For fine tuning a piece of sandpaper laid on a flat surface works great, holding the piece vertical and giving it a few strokes with light pressure across the sandpaper will shorten a board up just fine. With all tools, caution and safety is important. Remember this is a real wood product. There might be some warping. Material if not being used for a while (overnight) should be wrapped or bundled together. So when you stop for the day, wrap it up. If you do get some warped pieces, carefully bend them in the opposite direction and you can temporarily remove some of it. Once it is glued together as a composite structure it will become stable. Most material is shipped in 18"-20" lengths, that is equal to 36-40 feet in real dimension. I don't think you will find many real boards that long without some warp. Always cut longest elements first and use the leftovers for the smaller items.Unique to this kit,
The base bridge kit can be lengthened as needed. For every foot you add you will need, 1x4 2@18”, 1x12 40@18”, 2x4 12@18”, 2x6 14@18”, 6x6 8@18”, 4x12, 6@25”, 12x12 5@25”. This is a rough estimate and in the future may be available as an add on lumber bundle. Easy way to add on is start at one end and complete the first 12” of the framing parts and slide the parts down and fill in with the add on section and then complete the other end.Work area,
Use a flat smooth surface to work on. We recommend you use wax paper laid on the plans and on your layout board to keep glue from sticking. So on with the show!Before getting started, now is a good time to look over the plan set and decide if you are adding length to your bridge and adjust accordingly. Also any other changes you might think of to personalize your bridge to fit your design thoughts.
Use a sharp pencil. You can mark most elements right off the drawings with very little measuring. Start by laying out 2 end walls and 2 side walls per drawing #1. Framed with 6x6 and 2x6 as blocking as indicated on the drawing. Note 4x12 diagonals on side walls will be added later.
Start with a few elements and add more until the walls are finished. Always cut long pieces first then use the short leftovers for the short pieces such as blocking.
One end wall frame finished. One more to go.
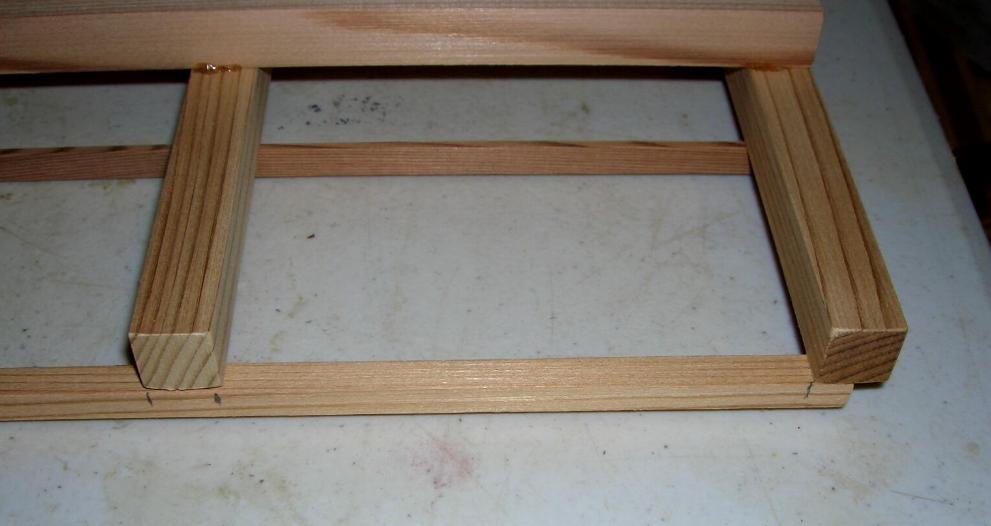
Side wall, notice we started with the second 6x6 upright frame element as it is at the joint of the top element. Since the material comes in 18” lengths there has to be a joint.
A close up of the joint. Hand written during the prototype process and changed to show on the final plans shipped with the first production run of kits.
We found it was easier to add the cross pieces and vertical 6x6 posts together.
Add more elements and work your way to the other end. Remember there are no 6x6 uprights at the ends of the side wall framing. The side wall framing will attach to the 6x6 posts of the end wall framing at each end of the bridge.
Build the bridge base with 12 x12 per drawing #2. Note the track stringers are full length unless you are adding length to your covered bridge. If you are adding length, then you want to stagger the joints on the track stringers. For example for adding a 12” section to the middle of the bridge, starting at one end have every other track stringer cut at 12 1/2” long and the others at 24 1/2”. The side walls and roof sections are simple to lengthen, just do it in the center of them. Here track stringer laid on the plan and center of each bottom cross beam marked. This is where you should drill if you are nailing your base. We used 18 gauge brass escutcheon pins 3/4” long from the local hardware store. Holes drilled are to prevent splitting. Hole size should be for what ever size nails are available in your area. You could also just glue the base together, however we prefer the additional strength of nailing.
12x12 cross brace laid on the plan and the spacing of the track stringers marked on them. This makes it easier to space the stringers as you assemble the base.
12x12 track stringer showing the drilled holes.
Cross beams laid on the plan ready for the stringers.
First stringer glued and nailed in place.
The next outside 12x12 stringer added.
All the stringers added. Remember if you are adding length to your bridge to stagger the stringer joints. This will make for a strong bridge that will last for many years.
Using 2x6 laid flat, build 13 trusses per drawing #2. The rafter ends are slightly longer than needed. These will be trimmed off later when the 2x4 roof board frames are added.
Base laid on top of the side wall framing.
Mark the edges of the base cross beams. This is where the 4x12 diagonals will be.
Since the 4x12 is in 25” lengths the diagonals can be cut to size as shown on drawing #2, or left long and the angled ends trimmed after they are glued to the backside of the side walls. 24 diagonals will be needed.
The first layer glued and held in place by wood blocks. We left them long and trimmed the top and bottom later.
A small spacer of 4x12 added to the bottom side of the top layer. Just a 1/4” long piece of 4x12.
Second layer shown here off to the side after putting them in place to mark where they go so you know where to place the glue. You will also need 4 of the small 4x12 spacer blocks as shown on drawing #2.
Notice the end of the top of the wall, the 4x12 needs to be trimmed so it doesn't interfere with the end wall frames when they are attached.
Assemble the end and side wall framing with the side walls inside the end walls. Outside dimensions should be 12” wide x 25” long.
Larger side view of all walls assembled together.
Attach the wall assembly to the top of the bridge base.
Lay the structure on its side on drawing #4. Mark where the trusses are attached to the top of the side walls. Flip the structure over and do this on the other side.
Structure on its end on a solid surface and the first end truss added. Once the glue has cured, do the same on the other end.
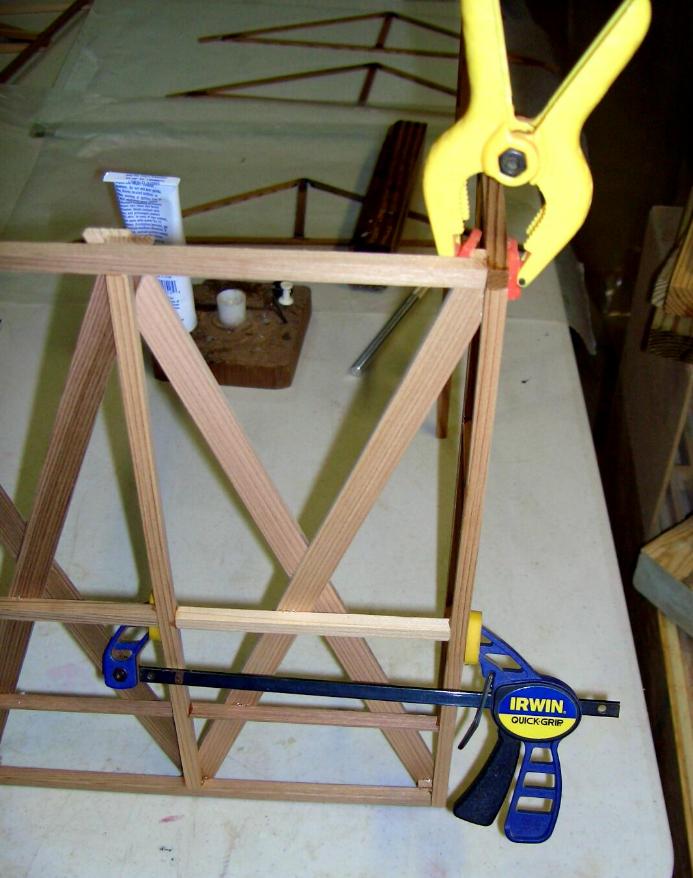
Attach the roof trusses spaced as shown on drawing #4 as shown in blue. End trusses in place and the extra 4x12 clamped with the top edge lined up with the peak of each end truss. The remaining trusses will be lined up at the peak.
Center truss in place, notice the piece of 2x4 clamped to the top of the side walls. This was because the prototype was a little wide there. So we did this to pull it back to the 12” wide width. The the center truss added. A clamp at each side of it on that 4x12 to just keep it upright and in the approximate position. We put marks on the 4x12 as well from the truss spacing on drawing #4.
A few more trussed added. The clamps aren't clamping the truss to the 4x12 they are placed one on each side just to hold it upright.
All the trusses in place. Alignment at the peak is very important. The ends of the rafters will be trimmed later.
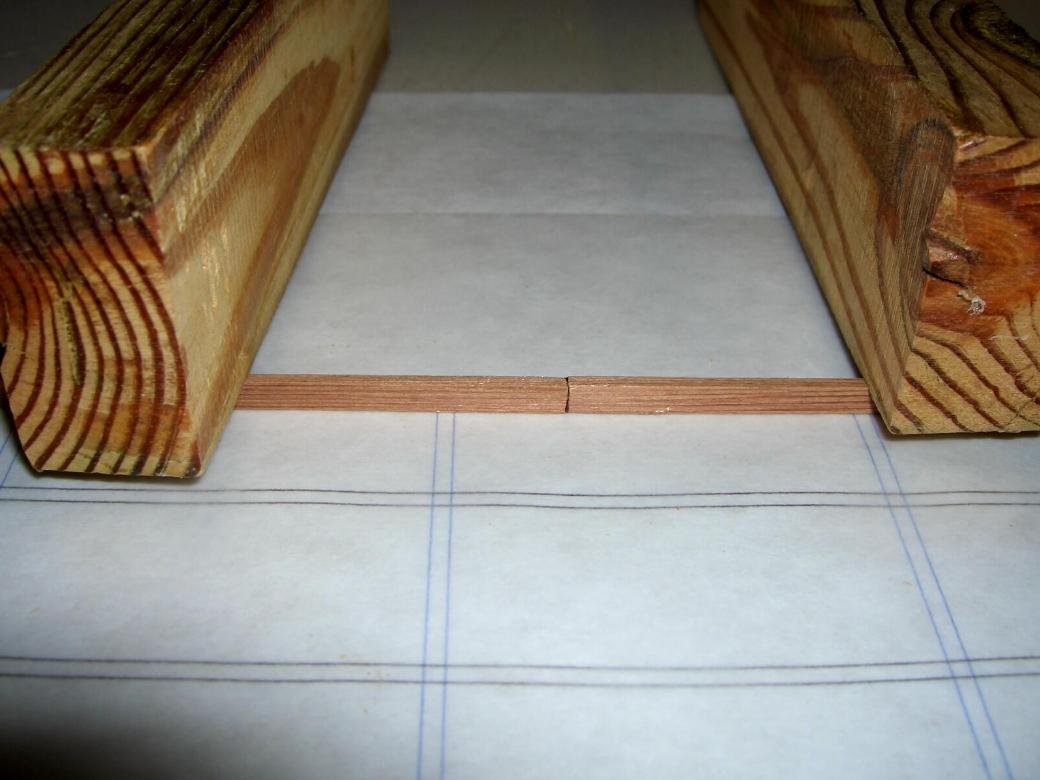
Build 2 roof frames with 2x4 on edge per drawing #3. Their placement and roofing application is shown on the end view detail drawing on that same page. Shown here a joint. They aren't shown on the drawing, just use the material in the length it came for the first piece then cut one down for the second one. Do this for the entire roof panel.
Here an overall view. Notice the short cut off will be used for the blocking pieces.
Closeup of blocking. There is none in the middle as these panels will be attached to the top of the roof trusses.
One roof panel completed. Use the same construction method for the second one.
The top 2x4 of the roof panel is 28” long. Put a mark at the middle of it as this is where the center truss will be.
Do the same on the bottom so you can line it up on the center truss at the eaves.
Attach the roof frames with the longest side at the peak of your trusses. Top center mark shown centered on the center truss. Do the same at the eaves. At the top the roof panels should have approximately 1 1/2” overhang at the end of the peak.
Center mark of bottom 2x4 of the roof panel centered on the center truss at the eaves.
Roof panel in place. Notice structure with blocks under one side so we could use simple wooden blocks to hold the roof panel down while the glue dries. At this point it is only glued to the center and end trusses.
Shown here the method we used to glue the roof panels to the rafters. A dab of glue on each side where the panel meets the rafter of the roof truss.
As you get to the other trusses adjust spacing at the peak as needed so they are on about 2” centers. You can see here more of the same gluing method.
Both roof panels in place. Same method used to attach the second side.
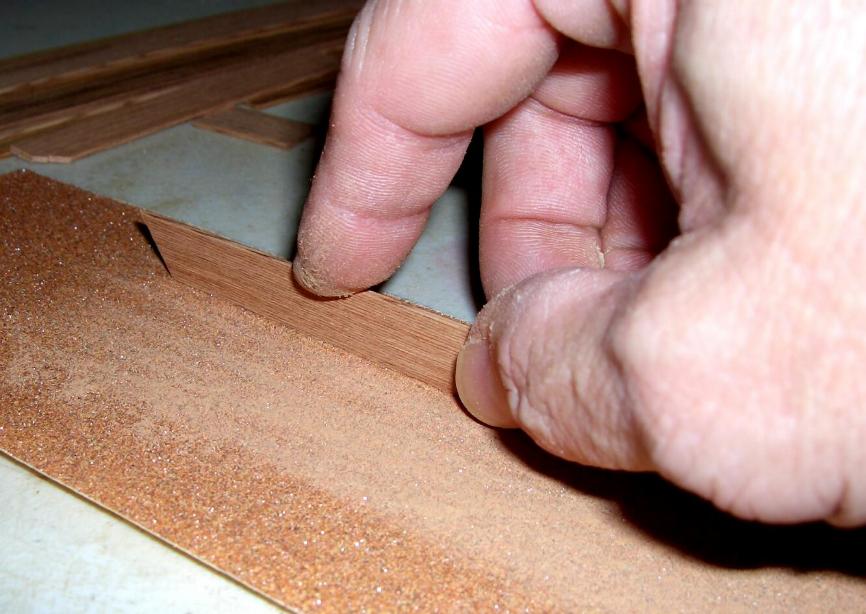
The end of the truss rafters should be flush with the bottom of the roof panel. Trim rough with a razor saw or side cutter, then sand with a flat sanding block as shown here.
1x12 siding starting with the end walls. Start at one corner and work your way to the center. Top is trimmed flush with the top of the roof truss and the outside edge is flush with the framing of the end wall.
Notice once we got to the top we left the angled ones overhang the framing a little. About 1/16” is what we did.
Notice the notch of the last piece to cover the framing at the top of the gusset. We rough trimmed it then fine tuned it with sand paper. Stop at this point and start from the other side and do the same thing.
As you work your way to the center trim the last 4-5 boards at the center. Cut them to rough length then sand a little off of each until they as a group fit the opening in the middle. This will keep you from having just one board that is really narrow. Not a real important thing but that is how we did it. You could just trim one somewhere in the center area and leave the others full width. Your choice.
Both ends completed.
1x12 siding on the side walls, start at one corner with the siding covering the edge of the 1x12 on the front wall. This siding should go from the bottom of the track crossbeam to the top of the 6x6 cross blocking just under the center of the 4x12 diagonals.
Add boards as you go. We left them extend to the bottom of the crossbeams of the base.
Last piece we used a piece of the 1x4 instead of trimming a 1x12 down that much. You can do the same if your results end up similar to ours on the prototype. If you use the 1x4 for the second side take the piece off a full length 1x4 so you end up with only 2 joints on the 1x4 roof cap that will be installed later.
Full view of side wall siding.
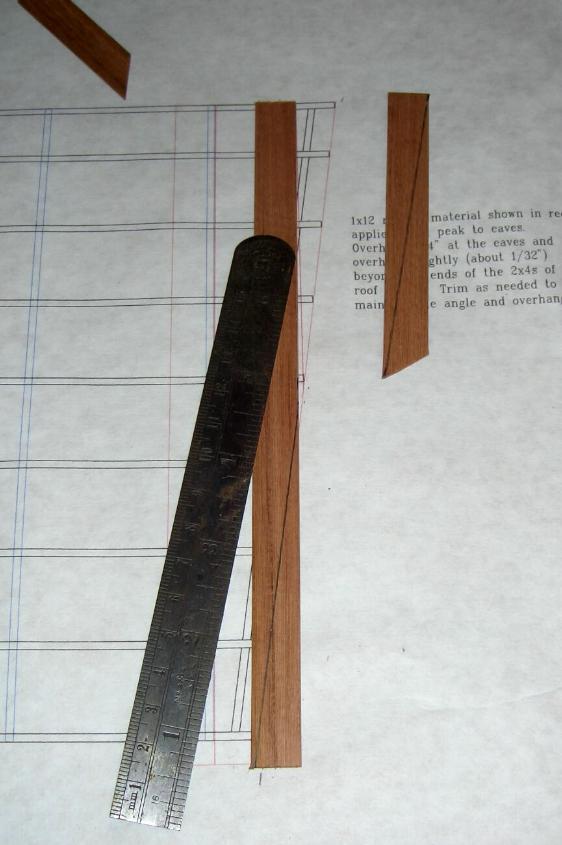
1x12 roofing installed vertically. Start at one end with 1/4” overhang at the eaves outside edge slightly overhanging the 2x4 ends of the roof framework. We placed the pieces on drawing #3 and with a straight edge marked the angle cut. Then rough cut it about 1/32” outside the line. Later we will fine trim it so it is flush with the ends of the roof panel 2x4 ends.
Here the first end done.
Since we were using slow setting glue we did the opposite side.
Then checked each side with a square from the peak. This is important so once you get to the middle you have a fairly parallel opening to fill with roof boards.
The extra 4x12 (used earlier at the peak) is used as a straight edge here to keep the eave end of the roof boards straight. Work your way to the center and stop a few boards from center and do the other end. Once you get within a 4-5 boards of center, try a sample fit with no glue to see what trimming is needed. Same edge sanding method was used.
A close up of the center showing the fill area. When edge sanding we take a few strokes then check fit. It is better to sneak up on it then end up with a board too narrow.
Both sides of the roof done. Looking great!
Use 1x4 for roof cap as shown on drawing #3. Since the 1x4 is in 18” lengths there will be a joint somewhere in the middle of the roof.
Painted, we used a cinnamon color for the walls, light brown for the roof .
One of our favorite locos added on a section of track
This is a 1/24th scale loco so you could see there is a lot of extra stack room.
We recommend all parts that come in direct contact with the ground get a good sealing with any clear sealer that works in your area. If you stain the wood, do that first then seal. If you want to have a natural gray cedar finish, seal only the ground contact areas (footings and all backsides) and let Mother Nature do the rest.
Good Luck and Happy Railroading!
Thanks,
Mark & Sue Smith
Smith Pond Junctions Railroad Products
Team@spjrr.com
Little Lumber is Our Business
All Rights Reserved