| Scale Lumber, Building Kits and related Products
for Garden Railroading. Our Kits can make the Novice Modeler look
like a Pro!
|
| Accessory Kit
#1 |
(click on photo's for a larger image)
| | Scale Lumber, Building Kits and related Products
for Garden Railroading. Our Kits can make the Novice Modeler look
like a Pro!
|
| Accessory Kit
#1 |
(click on photo's for a larger image)
Glue Tips,
Make sure to use a waterproof glue suitable to your climate. If you can get waxed paper in your area, for frame elements, we dip the ends in glue and put them in place on the wax paper over the drawing. The new waxed paper we get has little wax, and works great as the glue sticks slightly to it making it stay in place. It peals off well after the glue is set, but leaves glue that might have to be trimmed later for fit with other components. As with all glues, excess is best cleaned up before it sets. If you will be doing a clear finish, we have found that small glue mistakes don't show if clear setting glue is used, and Thompson's clear water seal is used. Still it is best to clean up, especially areas where a hardened glob interferes with further construction. (Easier to remove a soft lump than a hard glob)
Cutting Tips,
For cutting small material (1x2 & 1x4) a sharp knife or even side cutter can be used. For larger sizes a razor saw or band saw with a fine tooth blade works well. For fine tuning a piece of sandpaper laid on a flat surface works great, holding the piece vertical and giving it a few strokes with light pressure across the sandpaper. With all tools, caution and safety is important. Remember this is a real wood product. There might be some warping. Material if not being used for a while (overnight) should be wrapped or bundled together. So when you stop for the day, wrap it up. If you do get some warped pieces, carefully bend them in the opposite direction and you can temporarily remove some of it. Once it is glued together as a composite structure it will become stable. Most material is shipped in 18"-20" lengths, that is equal to 36-40 feet in real dimension. I don't think you will find many real boards that long without some warp. Always cut longest elements first and use the leftovers for the smaller items.
Layout Boards,
Also notice the layout board we have been using. It serves as a nice flat work surface. It is made of a piece of graph paper sandwiched between two pieces of single strength glass. The edges are taped together with clear packing tape. The graph paper makes it easy to keep things square. We recommend you use wax paper to keep glue from sticking laid on the plans and on your layout board if you use one, but it isn't always available here and might not be in your area. So on with the show!
This is a different kit compared to the others we offer. Things needed to complete a farm scene, or to add to other buildings in a town scene. Fence for a corral, watering troughs & hitching posts. Think about size to vary dimensions so they fit with your buildings. You might need the hitching post higher, because the building it's in front is on a slight slope, or that your building is raised slightly from ground level. But remember horses & humans are all uniform in size within certain parameters. Use common sense, and IMAGINATION.
This kit includes enough material to experiment with various sizes and types of accessories, within reason. Fence, to build (1) corrals 12" square, tall or short gate frame. Troughs, to build (2) 2 1/2" long. Hitching posts, to build (2) 6" long (including distressed 4x4 for uprights and top posts).
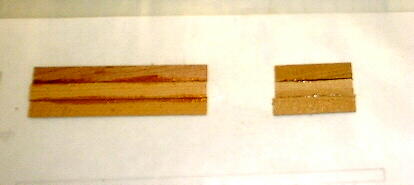
Marking components to length from the plan.
1x6 laid on plan with a wood block to hold them in place.
Epoxy mixed on a piece of waxpaper. If you use epoxy as we did, it will take a little while to get used to how fast it sets up, and how much to mix for the parts you have to join.
Epoxy applied to 1x6 fence boards with a stick and then 4x4 posts placed on top of fence boards. If you change the size of your corral, change the spacing of the posts so they are even, but don't be too perfect.
2x4 added to backside of gate area. You can cut the gate sections apart if desired with a razor saw and glue them in an open position if desired.
Using a scrap of fence board to scrap off excess epoxy before it sets up.
Blocks on top of posts to hold them down until the epoxy sets up.
Top fence section turned over and 1x6 diagonal bracing placed on the front side of the gate. Bottom section in this case is a back and no end posts have been added.
Sides of the corral. In this case we were making a right and left side (with end posts on opposite ends) as you will see later short fence sections to use this corral with our animal feed shelter kit.
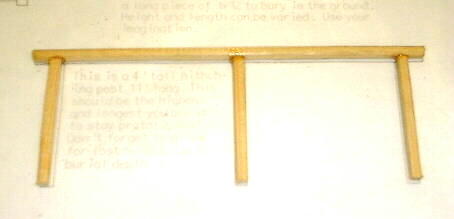
Starting the gate frame for a tall frame per drawing #3. Use your imagination for variations on this. Light gauge wire such as paper clip could be bent to form a brand and attached on top or hanging down from the top cross member.
In this case since the epoxy wasn't set on the gate frame we laid the 1x6 fence boards over the top of the posts and gate frame.
4x4 added as gussets.
Assembly face down to add the 2x4 gate framing added from behind.
Turned over again and the 1x6 diagonal gate braces applied.
One corner joined and wood blocks to hold it in place until the glue sets.
If you have a hard time with the sections right side up, try turning everything upside down (this only works for the short gate style) as the long top area of the fence boards sometimes makes it more stable than setting on the posts.
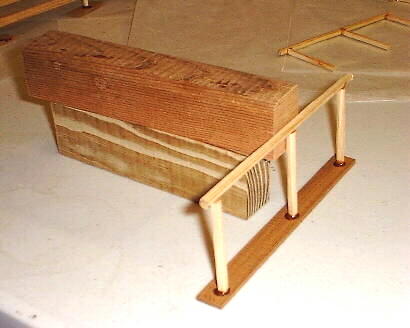
Tall front being attached.
Short fence ends for use with animal feed shelter as mentioned above.
Tall gate type hung over end of table to make it easier to attach back fence section.
Short fence ends applied. Note this was just for our using this with the other kit. There is enough material in the kit to complete this back section. Structure upside down to make it easier to add the short sections.
1 1/2" long pieces of 2x12 added to the bottom of the posts for burial in the ground.
Same with the other corral.
In this case we spanned both posts with the same piece.
1x6 edged glued together to form panels for the troughs.
An end here left long so it can be trimmed to what shape you desire.
Bottom, side and end joined for the angle sided trough. The drawing is just a rough example of the angle.
Other side and end in place and a wood block on each side to hold it together.
Square end trough. Top of ends can be trimmed flush with top of sides later. Excess epoxy can be scraped off when set up with a sharp hobby knife.
4x4 assembled for a hitching post. All the 4x4 in the kit is distressed. If you want you can trim the ends to fit the bottom of the top cross piece. We didn't and it isn't that noticeable.
2x12 added to the bottom for burial in the ground. You can use separate short 1 1/2" pieces cross ways if you desire, or extending to the bottom edge of a building they will be used in front of.
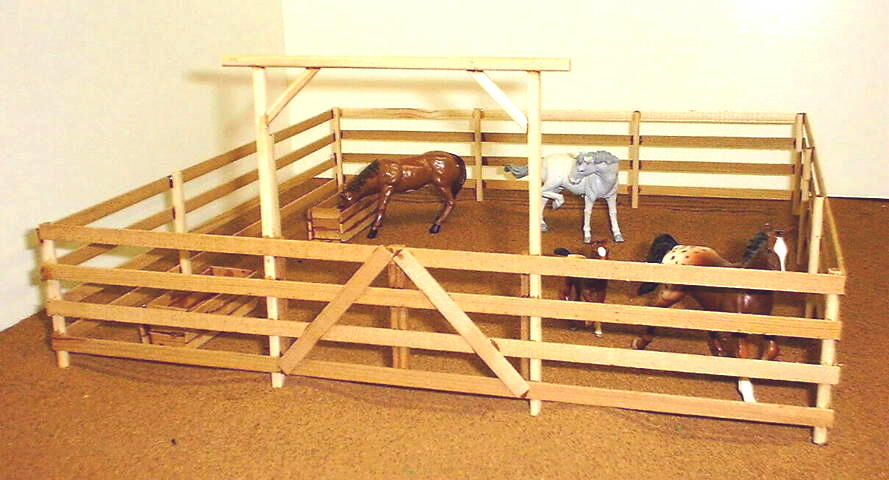
Corral with the short back sections shown with the animal feed shelter kit.
Another view of the same.
The tall gate frame a nice detail.
Notice feed troughs in place. Separate 1x6 boards add extra detail.
Hitching post with base buried. Note, the end of the top still has a sawn end. You could round it somewhat so it looks distressed, used or a hand hewn look.
Just remember to seal everything to keep moisture problems to a minimum. Finish with exterior paints, as you would real outdoor structure. We recommend buildings be taken in over the winter months.
Good Luck and Happy Railroading!
Let us know if you have any suggestions or input for this tips page!
Thanks,
Mark & Sue Smith
Smith Pond Junctions Railroad Products
Team@spjrr.com
Little Lumber is Our Business
All Rights Reserved